Ready to track your TikTok Ads conversions?
Civil Pixels will track all of your important events for your TikTok pixel in just a couple clicks.
Watch the video below or follow the steps in this article!
Step 1: Enable your Tik Tok events
Tik Tok requires some configuration on their dashboard. We’ll walk you through all of that in Step 1.
Head over to TikTok’s Ads Manager and go to Libary > Event from the navigation bar.
- Click on Manage on the Website Pixels card.
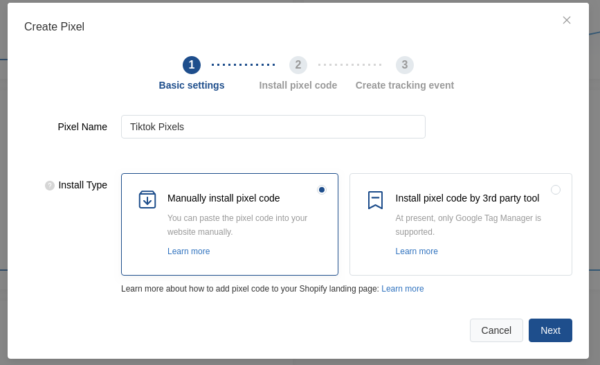
- Click the Create Pixel button from the top right of the screen.
- Choose Manual install pixel code as the install type.
- Give your Pixel a name. This is only for your reference. Then click Next.
On the next screen, you’ll see some options for events.
Select E-commerce Events. Then click Continue to setup event rules to continue.
Now we’ll need to do a little editing in the Tik Tok dashboard.
We’re going to do the following steps for each tab: Product Details Page Browse, Add to Cart, Place an Order, and Complete Payment.
- For the tracking method, choose Click Events
- Click add a rule and enter
.civilpixels-placeholderin the CSS Selector Field. Click Save on the top right side - Click on the next event tab and repeat steps 1 – 2.
This placeholder lets CivilPixels know about the TikTok Event so that it can fire on the correct user action like Purchase and Add to Cart.
Click Complete and we’re all set up on Tiktok’s side. The last thing we need to do is copy the TikTok Pixel ID.
Back on your Library > Events page, the ID is underneath the name of your pixel. In our example, it’s BRKST7BJ85747I0N0N0 but yours will be different.
Go ahead and copy this ID.
Step 2: Enter your Tiktok Pixel ID in Civil Pixels
Head over to the premade script library where we list all the integrations you can use.
To get there, open up Civil Pixels from your Shopify app page. This brings you to the Civil Pixels dashboard. You’ll see a nice big “Add New” button in the Premade Scripts section.
Click on the TikTok card to begin the integration setup.
Paste the Pixel ID from Step 1 into the TikTok Pixel ID field.
Step 3: Pick your Options
Alright, now all we have to do is pick what we want to track. I’d recommend leaving all of them checked, but you can disable events you don’t want to track. These can be enabled later if you change your mind.
Step 4: Hit the “Install” button
At the bottom of the page, you’ll find a button labeled “Install.”
Click it and you’re done! TikTok ad conversions are now being tracked on your site.
Next steps
Making sure it works
If you’d like to make sure the pixel is working, Tiktok has made a Chrome extension to help. The Tiktok Pixel Helper will check your pixels for you as you browse your site.
Changing things up
If you want to configure your options or customize the tracking script after installation, you can do that easily! Head over to the Civil Pixels homepage from your Shopify apps page.
Under the “Integrations” section, click on the Tiktok Pixel card.
You’ll be brought to a summary page for your Pixel. Here, you’ll find the scripts that make up your Tiktok Pixel. Each script represents one conversion event or the base code. To toggle a certain event, just enable or disable the corresponding script!
Further Questions
Need more help? Get in touch – email tech@rvere.com and we’ll get back to you ASAP.