Let’s track your conversions for Twitter Ads!
Civil Pixels will track the necessary events to see which ads actually make you money and to let you retarget. You can see a list of all the events and event data our Twitter integration provides in our Twitter conversion events article.
Step 1: Start the integration setup
We’ll start off nice and easy. Head over to the premade script library where we list all the integrations you can use.
To get there, open up Civil Pixels from your Shopify app page. This brings you to the Civil Pixels dashboard. You’ll see a nice big “Add New” button in the Premade Scripts section.
Click on the Twitter card to begin installing the Twitter conversion tag.
Step 2: Enter your Twitter Tag ID
Now for the hard part (I promise it’s not too hard). The integration setup will prompt you to enter your Twitter Tag ID.
We’ll need to create a tracking tag in Twitter and copy the ID that Twitter provides.
Head over to your Twitter Ads Manager.
Log in if you haven’t yet. Then select the Tools drop down, then click Conversion tracking.
You’ll arrive on the conversion tracking page.
If you have a Twitter Tag already
In the event name column, look for something that looks like “Website Tag ID: abcde”. Copy the sequence letters only and paste them into Civil Pixels. In our example, the tag ID is abcde. Your tag ID will be different
Once you’re done, move on to step 3!
If you have no tags
On the top right area of the page, you’ll see a big button labeled Create new conversion event. Click it.
This will bring you to a new page where you can create your tag.
Give your tag any name. Then leave the “Select the type of conversion” area alone, this doesn’t matter for our purposes.
Leave the rest of the options to their default. This should be:
- Use a universal website tag selected.
- Include traffic that meets any of the following conditions should be All Website Visits.
- Specify custom attribution window can be anything you want, but we recommend leaving the default of 30 Days post-engagement and 1 Day post-view attribution.
Agree to the Terms & Conditions, then click the Save conversion event button.
This will reveal the page below. Copy the highlighted letters without any quotation marks from the code box. In the example below, that would be abcdefg. This is your tag ID.
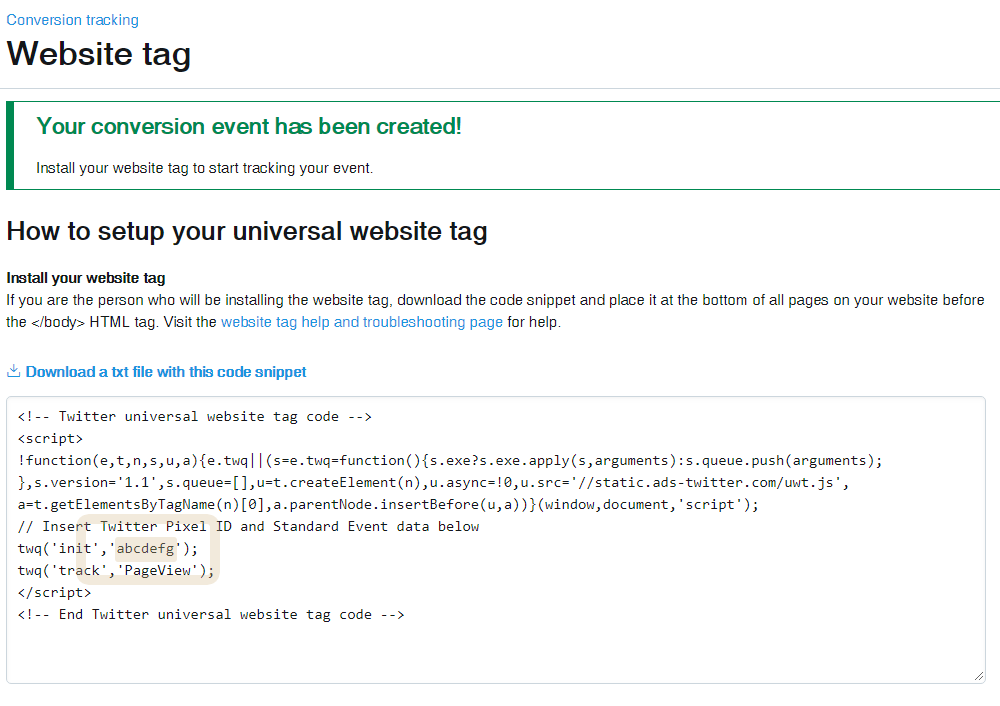
Take the tag ID as highlighted above and paste it into Civil Pixels.
Step 3: Pick your Options
Alright, now all we have to do is pick what we want to track. I’d recommend leaving all of them checked, but you can pick and choose which events you want to track. These can be re-enabled later.
Step 4: Hit the “Install” button
At the end of the page, you’ll find a button labeled “Install.”
Click it and you’re done! Twitter ad conversions are now being tracked on your site.
Next steps
Making sure it works
If you’d like to make sure the pixel is working, Twitter has made a Chrome extension to help. The Twitter Pixel Helper will check your pixels for you as you browse your site. Just make sure any ad blocking extensions you have are turned off (they block trackers like the Twitter tag).
Changing things up
If you want to configure your options or customize the tracking script after installation, you can do that easily! Head over to the Civil Pixels homepage from your Shopify apps page.
Under the “Premade Scripts” section, click on the Twitter Tag card.
You’ll be brought to a summary page for your tag. Here, you’ll find the scripts that make up your Twitter Tag. Each script represents one conversion event or the base code. To toggle a certain event, just enable or disable the corresponding script!
You can also edit each script if you want to send different parameters to Twitter. Just click on the script and you can edit the underlying code for it.
Using the Data
Your Twitter conversion tag provides data for seeing how your ads perform and for retargeting visitors on Twitter.
Here’s how to view your Twitter Tag conversions, and
Here’s how to use your Twitter Tag for retargeting
Further Questions
Need more help? Get in touch – email support@civilpixels.com and we’ll get back to you ASAP.